No matter how well you take care of your tires, or how careful you are as a driver, the truth is you may still find yourself on the wrong side of a flat tire. As such, knowing how to change a tire is a must for any driver. This skill came in handy as I found myself in this exact scenario this past weekend. And the best way I knew I could make lemonade out of lemons was to document the steps I took on the side of the highway for your benefit.
Please note that the steps I am going to show are specific to my vehicle – a 2015 Toyota RAV4. The steps will be similar for most any vehicle. However, it is still a good idea to consult your car’s owners manual for the specific steps and locations of items for your vehicle.
1. Get your vehicle in as safe a place as possible
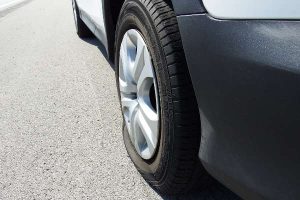
Changing a tire, specifically on the side of a highway, is dangerous. Once you realize that your vehicle has a flat tire – in our case, it sounded like a helicopter was next to us – getting off the drivable road onto a flat, stationary shoulder or similar surface becomes necessary. Give as much space as you can away from traffic without putting you or your vehicle at risk. Cars on the highway are frequently traveling 70+ mph, and if one clips you, you can be seriously injured – if not fatally. Please be smart about where you park your car.
It is also a good idea to turn on your hazard lights (the triangle button typically found on your vehicle’s console), as to alert other drivers. Many when they notice your hazard lights will move to a lane farther from you if able and/or slow down. Some may even call the police to come and help, or they may even try to help you themselves. Regardless of the outcome, it is always a good idea to have your hazard lights on, especially at night.
2. Get everyone out of the vehicle
No one should be in the car when you try to change a tire. When you change a tire, the car will need to be jacked up. The car jack can be unstable – especially if you are changing a tire on an uneven surface. It is far safer to keep everyone who is not helping change the tire out of the car and away from oncoming traffic.
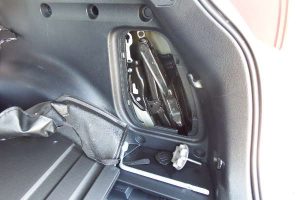
3. Locate and remove the spare tire, car jack, and lug nut wrench
Most modern vehicles have each of these together. Typically in the back trunk of the car and under the trunks mat. Some cars do come with a full replacement tire, the position may vary for those vehicles. If you have trouble locating any of these items, consult your vehicle’s owners manual. For my RAV4, the spare tire was under the mat in the back trunk along with the lug nut wrench. The car’s jack was in a compartment to the right of the trunk, behind a plastic cover. It is a good idea to know where these items are before you have a flat tire.

4. Loosen the bolts on the flat tire by one turn
Before jacking the car up, it is a good idea to try and loosen the lug nuts by one whole turn and no more. Lug nuts can be difficult to loosen at first – you don’t want those tires coming off while you are driving – so the added friction of the tire on the road can help you untighten the nuts easier.
Also, before untightening the nuts, you may want to remove the hubcap, as it might get in the way and/or be damaged in the process of changing the tire. Typically the lugnut wrench will have a flat edge to help you pry the hubcap off. Removing it is good because it will only get in the way when loosening the lug nuts.
To loosen the lug nuts, use the lug nut wrench and turn to the left. It is much easier to stand to the left of the tire, and press the wrench down and to the right. This will give you the necessary torque in most cases to loosen the nuts. Do not take them off, as you may damage the pegs that hold the tire.
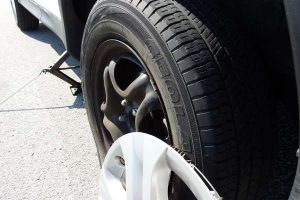
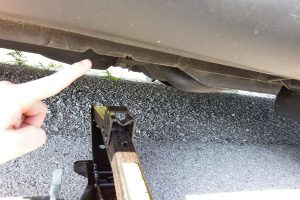
5. Jack the car up
After you have loosened each bolt one turn, you are ready to jack the car up. Each modern car comes with a point on the frame designed for the jack to be placed. This will be the most stable placement for the car while the car is jacked, and it will reduce the chance of any damage to the frame of the car while it is jacked. Consult your vehicle’s manual for your specific location. In my RAV4’s case, the placement was indicated by two grooves about a foot away from the wheel well.
After placing the jack in the right place, jack the car up until the tire is just above the ground if fully inflated. You may need to eyeball this height depending on how damaged your tire is.
6. Remove the flat/damaged tire
To remove the tire, simply remove the lug nuts at this point. If you completed the single loosening rotation, you more than likely can remove these nuts by hand. Once the lug nuts are off, pull the tire off the car being careful to lift with your legs when needed. Roll the tire to the back of the car and place the tire in the trunk. You will want to keep this tire if you can, as it may be repairable. A repair runs about $20 which is way cheaper than buying a tire which can easily run over $150.
7. Put the replacement spare/full tire on the car
Before putting the replacement spare/full tire on the car, it is a good idea to check the tire pressure. A spare generally is expected to be inflated to 60 psi while a full is expected to be the same pressure as your other tires – typically around 30 to 35 psi. The truth is, not many check their replacement tire’s air pressure and an underinflated replacement tire is about as worthwhile as the flat you are trying to change. A good rule of thumb is to check your replacement tire’s air pressure everytime you rotate your tires. If the air pressure is low, you can use a bicycle pump to give it the air it needs. If you do not have that, you may need to roadside assistance – this could be AAA, your insurance (if you added it to your policy), or a tow truck.
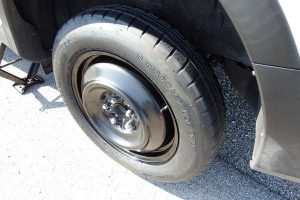
If your air pressure is good to go, then simply load the replacement tire on the car. Make sure the air valve of the tire is pointing away from the car. That way you know the tire was placed on properly. Then tighten each nut by going star-shaped pattern. This will make sure the tire is secured evenly along each peg.
8. Pack up and find a tire shop
After the tire is secure, you should lower the car. Place your tools back where you found them in the car for quick and easy access if you should need them in the future. The next goal is to make it to a tire shop to either get the flat tire repaired or replaced. If you have a full replacement tire, this is not as much of an issue, however, you should still probably get the flat tire taken care of. Please note, when driving with a spare, you should not drive over 50mph or over 70 miles. Getting to a tire shop should become a priority when driving with a spare.
It might take a bit of sweat to do, but changing a tire is a simple yet important skill that every driver should have. Being safe should be your priority. If you are uncomfortable changing a tire, then call for roadside assistance. A membership with AAA or roadside assistance from your insurance policy (if it was added) are great options. Just know that their response – in most cases – will not be as timely as you doing it yourself.
Quote of the day: I may be a living legend, but that sure don’t help when I’ve got to change a flat tire. – Roy Orbison